
Product Assembly
Assembly Guidance
Product assembly and installation guidance
Seagull Balustrades products are designed to be straightforward to install.
Find below fitting and assembly guidance for our stainless steel handrails, custom balustrade systems, and frameless glass balustrades.
Stainless Steel Handrails
Your stainless steel handrail will be supplied polished, cut to length and finished with flush-fitted end caps machined to match the 42.4mm diameter of the handrail.
Most handrails arrive fully assembled with the brackets already attached.
If you have ordered a Square Handrail or Contemporary Brackets, the handrail will be pre-drilled ready for the brackets to be fitted using the stainless steel machine screws provided.
Detailed fixing instructions
- Determine the height of the rail. Select a height between 900mm and 1000mm from the top of the stair tread.
- Measure the staircase from the nosing of the first stair to the floor at the bottom of the staircase. Add 300mm to this measurement.
- Measure and mark your desired stair rail height on the level beginning at the tread line, for example, if your stair rail height is 900mm, measure 900mm up from your first line and draw a mark at that point.
- Subtract the thickness of the railing and the height of the bracket from your desired rail height. Our handrails are 42.4mm in diameter, but measure your materials to be sure. Deduct this total from the 900mm line you drew.
- Measure from the lowest stair. Draw a small mark on the wall at the chosen measurement. Walk up the stairs repeating step 3.
- Drill pilot holes, and plug. Screw the brackets to the wall at these locations, using the supplied screws.
- Now attach the handrail to the brackets. We pre-drill the holes on your handrail so all you need to do is screw the bracket to the handrail using the screws provided.
Handrail Regulations for Stairs
Stairs should have a handrail on at least one side if they are less than 1m wide. If they are wider the stair should have a handrail on both sides. You do not need a handrail on the first two steps up.
If your staircase is wider than 1m then you need to fit wall mounted handrails.
Codes require that the railing follow the full length of stairs with either the top or bottom of the rail extending 300mm or more beyond the staircase length.
Stainless Steel Handrail Installation Questions
How easy are the handrails to install?
Will you install my handrail for me?
Does my handrail need earthing?
How do I maintain stainless steel handrails?
Does stainless steel rust?
Stainless steel is corrosion resistant, but it can still suffer surface corrosion in certain conditions, particularly if the wrong grade is used or if it is not cleaned periodically. Choosing the correct stainless steel grade and maintaining the surface properly will help keep it looking its best for many years.
Custom Balustrade Systems
If you are installing the system yourself, our stainless steel balustrades are designed to make the process as straightforward as possible. No welding is required, with installation generally involving bonding, drilling and, where required, tapping.
- Clean, straight-cut stainless steel tube
- Modular push-fit fittings that fit internally into the rail
- Aerobic bonding technology (industrial grade high strength retainer)
Dry-fit the parts and cut the tube
- Before bonding, assemble the parts dry to check the fit and position.
- Use a suitable fixed-blade saw to ensure a clean, straight cut.
- Use cutting fluid where possible to help prolong blade life.
- Remove any burrs from the tube after cutting.
Bond the joints
- Apply a small bead of high-strength retaining adhesive, such as Loctite 638 or similar, to the male insert part of the fitting.
- Insert the fitting into the tube, or into the female fitting, and adjust it to the required position.
- Hold or clamp the joint in position while the adhesive bonds. The joint will usually bond within 10–30 minutes and should be left for 24 hours to fully cure.
Drill and tap the stainless steel tube
- Clamp the tube securely in a vice or similar support.
- Mark the tube with a centre punch.
- Use cutting fluid where possible.
- Drill the holes using a suitable drill bit.
- Cut the thread using a thread tap, then remove any excess swarf.
- Alternatively, rivet nuts may be used where appropriate.
- Stainless steel is a very hard material. Please ensure all safety precautions are followed, particularly when drilling, tapping and cutting.
Custom Balustrade Assembly Questions
How do I attach glass clamps and brackets to the tube?
Is Loctite 638 strong enough?
How long does the adhesive take to cure?
Under normal working conditions, Loctite 638 usually begins to cure within approximately 10–30 minutes. This can vary depending on temperature and conditions. Joints should normally be allowed to fully cure for 24 hours.
Frameless Glass Balustrades
The frameless glass balustrade system has been designed to be as straightforward as possible to install. If you are not confident fitting the system, please contact a reputable glazier or builder. Should any problems arise please don’t hesitate to contact us.
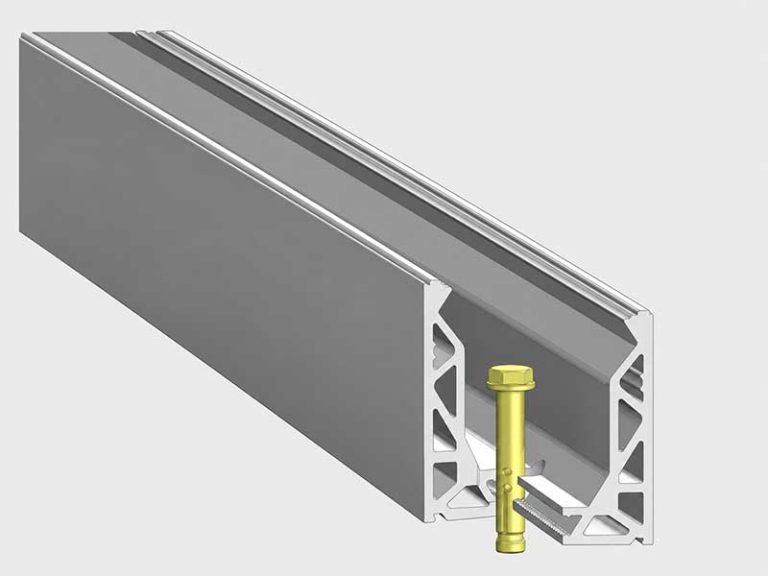
Install the base rail
Position the aluminium base rail in the required location and mark the fixing holes onto the substrate for drilling.
The channel should then be levelled and aligned using shims where required. Once the base rail is plumb and level, tighten the fixings to secure the channel firmly in place.
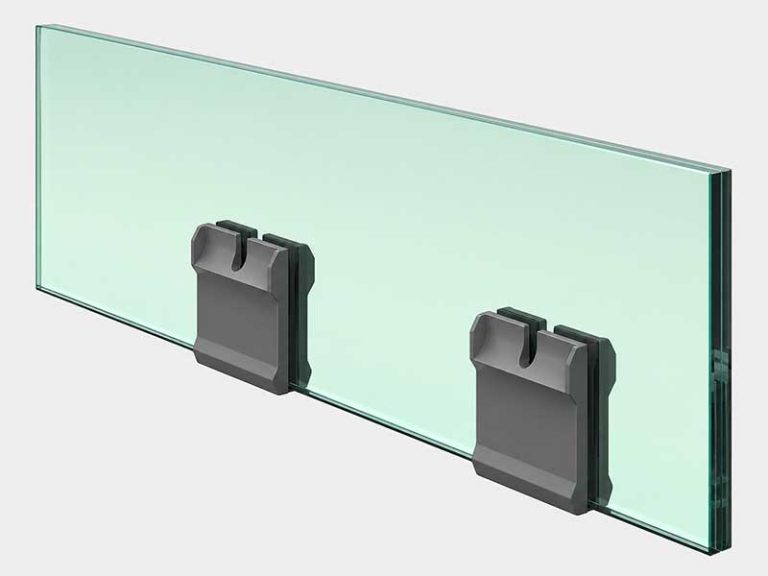
Fit the glass slip clamps
Fit the glass slip clamps to the bottom edge of the glass. This will require the glass to be lifted clear of the floor or carefully turned upside down so the clamps can be fitted.
Use four slip clamps per metre. The clamps at each end of the glass should be positioned 100mm in from the edge, with the next clamp positioned 250mm from that.
Once the slip clamps are in place, the glass can be lifted into the channel.
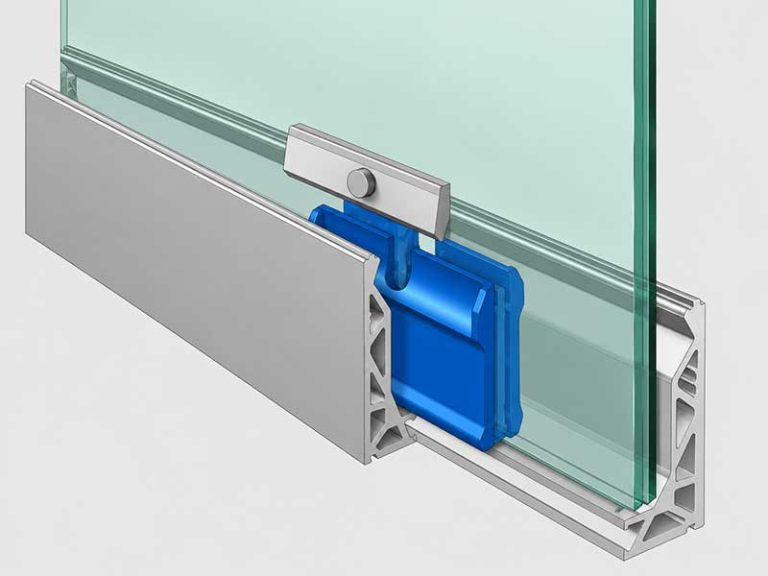
Fit the glass clamp bars
Once the glass is positioned in the channel, fit the clamp bars into the top of each glass slip clamp.
First, screw the bolt into the clamp bar until the head of the bolt just reaches the bar. The shaped side of the clamp bar should sit closest to the glass.
Each clamp bar can then be placed into the glass slip clamps.
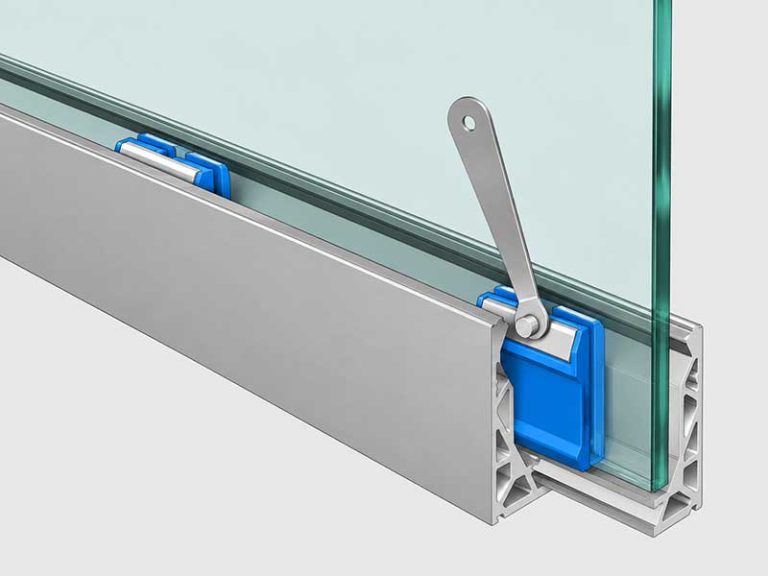
Plumb the glass and tighten the bolts
Use a spirit level to position the glass correctly.
Tighten the bolts evenly into the channel to apply consistent pressure to the glass. If the glass needs adjusting, loosen the bolts back into the channel and reposition the glass as required.
Start by squaring and levelling each end of the glass, then tighten the intermediate clamp bars. Once the bolts have pinched, give each one a further half turn to secure the glass in place.
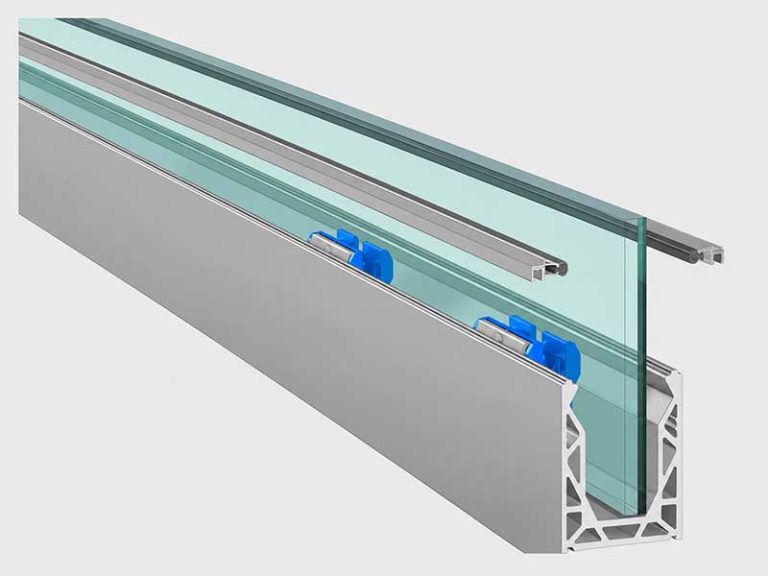
Fit the top seal strip
Feed the gasket into the smaller profile supplied, taking care not to stretch it.
Once the gasket is flush with each end of the strip, clip it onto the top of the channel by pressing firmly down on the profile. It is recommended to work from one end to the other.
Once everything is in place, clean the glass and channel using a standard non-abrasive glass cleaner and a soft sponge or cloth to avoid scratching.
Need advice on a balustrade
or handrail project?
Whether you need a glass balustrade for a commercial space, a made-to-measure handrail for a home renovation, or advice on the right system for your project, Seagull Balustrades can help.